
Managing Virtual Environments and Multiple Python Versions
A guide on how to never encounter module not found errors again

As a beginner, if you've ever bootstrapped projects in Python, chances are you have encountered the module not found errors. You might've googled and temporarily patched it with a band-aid. And one day when you update your Python version or modules, your project suddenly breaks. And everything falls apart. And you're reevaluating your life choices. Or is it just me?
Anyway, I've saved you a few clicks and chained scouting through StackOverflow and come up with a comprehensive (maybe) guide to tackle this once and for all.
I have two words for you. Virtual environments and Managing multiple Python versions on your machine is the key 🔑 . Well, that's more than two words. Okay, let's just get started!
Feel free to navigate around using the table of contents below.
Table of Contents
- Virtual Environments in Python
1.1 Creating a Virtual Environment
1.2 Activating a Virtual Environment
1.3 Creating a requirements.text file
1.4 Deactivating a Virtual Environment
1.5 TL;DR - Managing Python Versions
2.1 Installing pyenv
2.2 Installing Python using pyenv
2.3 Navigating pyenv
2.4 Pyenv-Virtualenv
2.5 TL;DR
Part I: Virtual Environments in Python
What is a Virtual Environment? And why do I need one?
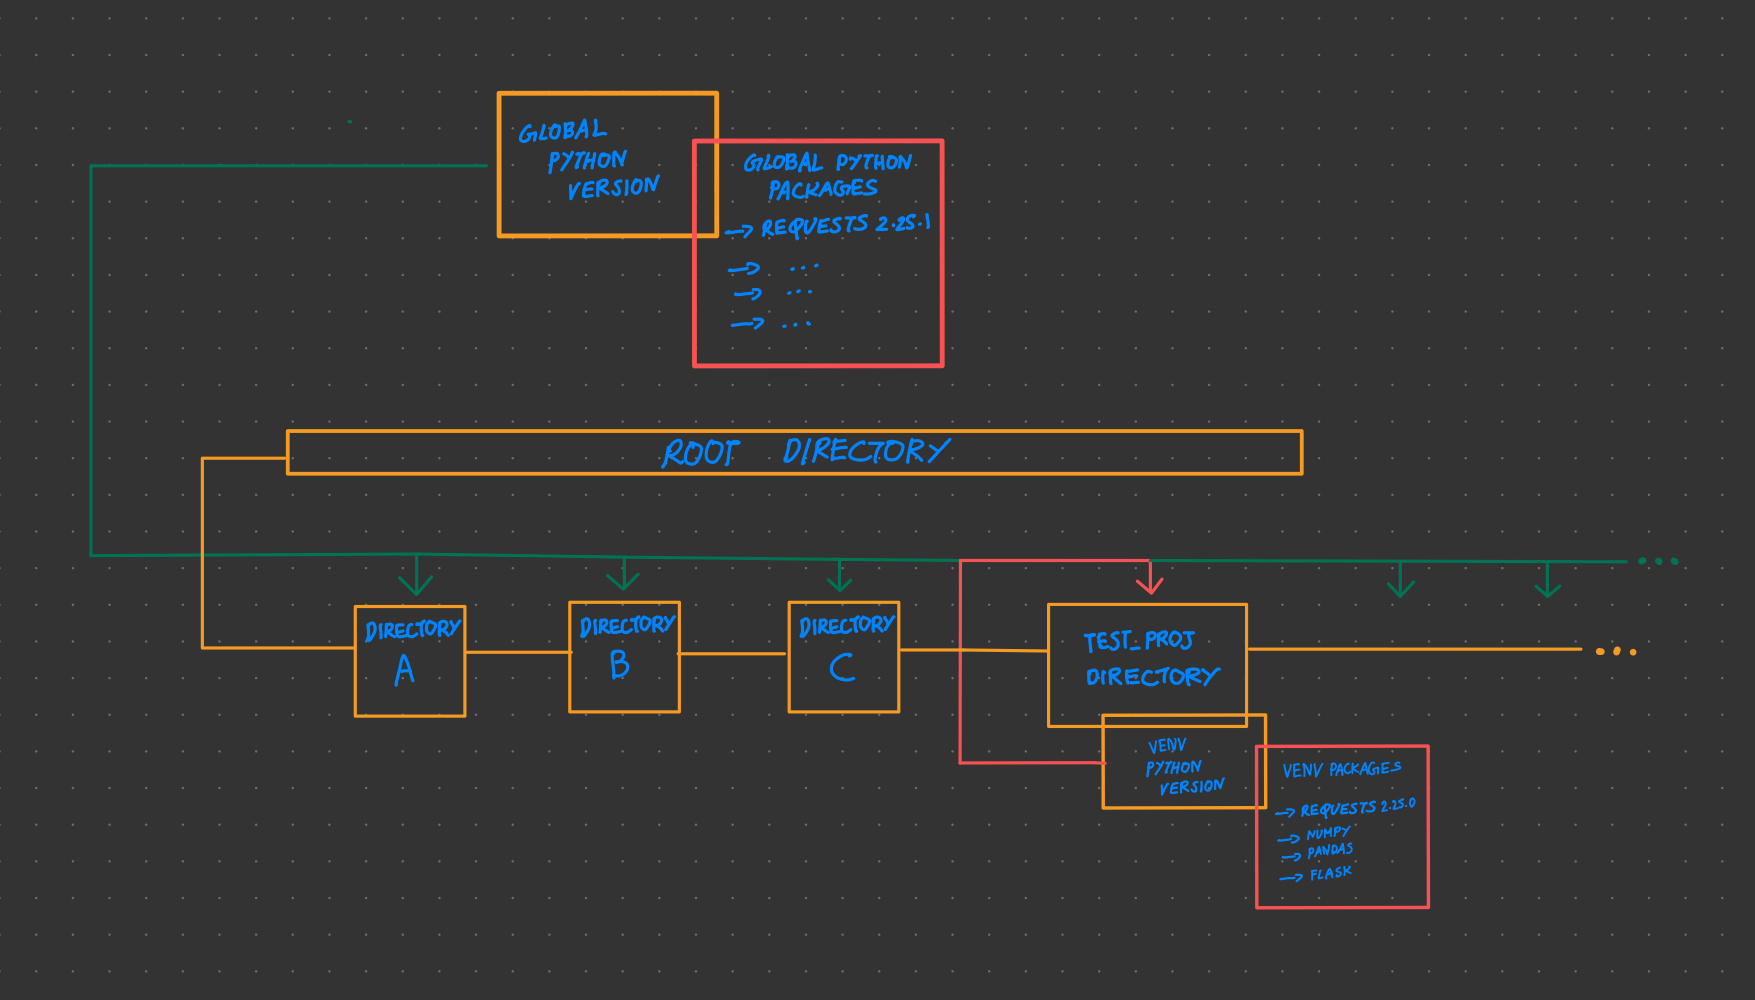
It's an isolated environment that you can create for your projects. And in this environment you can install the dependencies (packages) you need for your project without it conflicting the globally installed versions. This means every project can have its own copy of the dependencies. Well, let's create a virtual environment and see it in action. Before we get started, let's install a popular package called requests globally. Now to do that, open your terminal and type:pip install requests
Creating a virtual environment
The package we'll be using to create a virtual environment is called virtualenv.
You can install it using pip:
pip install virtualenv
Verify the installation ✅ :
virtualenv --version
Now let's create a folder for our test project:
mkdir test_proj
cd test_proj
Here's the command to create a new virtual environment:
virtualenv + [name]
Let's go ahead and create one for our project. I'm going to call it venv.
virtualenv venv
This command would’ve created a folder in the name we gave for our virtual environment with the following contents. In our case, 📂 venv.
-
📁 test_proj
|––📂 venv
|––––📂 bin
|––––📜 activate
|––––📂 lib
|––––📜 pyvenv.cfg
Inside the folder, there'll be a sub-folder named 📂 bin. And inside the bin, we have a shell script we have to execute to activate our virtual environment.
Activating a virtual environment
This is the command for activating a virtual environment:
source + [virtual environment]/bin/activate
Let's activate our virtual environment (venv):
source venv/bin/activate
Now let's check if the activation was successful:
which python
The above command will output a directory path that should look something like this:
test_proj/venv/bin/python
So the activation was in-fact successful, and now let's install some packages. But before that remember how we installed the requests package globally? Now let's find out if it works inside our test_venv.
Let's invoke the Python interpreter and try importing the requests package,
python
>>> import requests
This should result in an error,
Traceback (most recent call last):
File "<stdin>", line 1, in <module>
ModuleNotFoundError: No module named 'requests'
As you can see, the Python version inside our venv doesn't have a copy of the globally installed requests package.
Let's install requests again but, an older version, inside test_env. (As I'm writing this article, the latest version is 2.25.1).
Installing requests v2.25.0,
pip install requests==2.25.0
Now this will install an older version of requests inside our venv. Now when you try importing requests inside the Python interpreter, you won't get an error. So if you're ever having compatibility issues or you want to test an older or a newer version of a package, you can do so inside your virtual environment without system-wide consequences.
Let's install some more packages,
pip install numpy pandas flask
Now let's see what all packages we've installed in our virtual environment,
pip list
If you've ever gone through Python projects on GitHub, you might've seen a requirements.txt file. This file contains all the dependencies we need to run our project. So when you deploy your project on services like Heroku, Digital Ocean or AWS, it sets your runtime environment up using this file. Let's make one for our project.
Creating a requirements.txt file
You can create a requirements.txt file using,
pip freeze --local > requirements.txt
The local tag ensures that only the packages that are within the venv are written into the requirements.txt file.
Let's peek into the file we just created:
cat requirements.txt
This file should yield you the same content that resulted from the pip list command.
Deactivating a Virtual Environment
To get out of your virtual environment just use,
deactivate
And now if you run which python, it shouldn’t point to the Python that resides in your venv. It's always a good idea to deactivate your venv after you're done working with it. Although once you close your terminal session, it also terminates the virtual environment.
You can also delete the virtual environment by deleting the venv file. This will delete all the dependencies you installed inside your venv and reclaim the space occupied by it. Because with large projects, the dependencies increase, and they occupy a significant amount of memory. So once you're done with your project, delete the virtual environment. But preserve the requirements.txt file. Using this you can always create a new venv if you ever want to work with the project again.
TL;DR
1. It is helpful to create a virtual environment (venv) for your project because it isolates your project dependencies and provides a hassle-free way of managing them.2. You can create a venv using virtualenv + [name].
3. After creating a venv, you need to activate it using
source name/bin/activate.4. You can create a
requirements.txt file using pip freeze --local > requirements.txt.5. After you're done working with the venv, you can deactivate it using
deactivate.
Hey 👋 ! If you like my writing, consider subscribing to my free weekly newsletter. I send out essays/tutorials & newsletters 🗞 on Tech. Programming. Algorithms. You can read a previous issue here before you subscribe.
Part II: Managing multiple Python versions
Just like how we managed multiple virtual environments simultaneously, it is also possible to do the same with Python versions as well. You can also create a virtual environment in a specific version of Python. But why do I need this?Why do I need multiple Python versions?
Well say you want to try out features of a new Python release, but you don't want to mess up the environment of your current projects. Or say you want to deploy a project to cloud platforms like Heroku, which support only major releases of Python. Or you want to work with an older / newer version of Python. We luckily have a package called pyenv to facilitate this. Let's set this up!Installing pyenv
If you're on the mac,
Mac
1. Install it with homebrew :brew updatebrew install pyenv2. Replace the last word in the following command with, '.zshrc' or '.bashrc' or the config file you use depending on your shell.
echo -e 'if command -v pyenv 1>/dev/null 2>&1; then\n eval "$(pyenv init -)"\nfi' >> ~/.zshrc
3. Now restart your shell, so the path changes can take effect,
shell
exec "$SHELL"
4. Verify installation ✅:
pyenv --version5. If you run into any errors during installation, please refer to the read-me file here .
If you're on windows,
Windows
1. Install with pip:pip install pyenv-win --target $HOME\\.pyenv2. Using either PowerShell or Windows 8/above Terminal run:
[System.Environment]::SetEnvironmentVariable('PYENV',$env:USERPROFILE + "\.pyenv\pyenv-win\","User")
[System.Environment]::SetEnvironmentVariable('PYENV_HOME',$env:USERPROFILE + "\.pyenv\pyenv-win\","User")
3. Now add the following paths to your USER PATH variable in order to access the pyenv command.
[System.Environment]::SetEnvironmentVariable('path', $env:USERPROFILE + "\.pyenv\pyenv-win\bin;" + $env:USERPROFILE + "\.pyenv\pyenv-win\shims;" + [System.Environment]::GetEnvironmentVariable('path', "User"),"User")4. Close and reopen the terminal.
5. Verify installation ✅:
pyenv --version6. Run:
pyenv rehash7. If you run into any errors during installation, please check the read-me file here .
Installing Python using pyenv
You can list the Python versions available using:
pyenv install --list
It is a loooong list. So if you know which Python version you want to install, say, for example, I'll be using version 3.7.10:
pyenv install 3.7.10
And to follow along with this tutorial, I recommend installing versions 3.8 and 3.9 as well. This will take some time. So get yourself a glass of water to drink. Surprise your liver :)
Once the installation is complete, you can check the versions of Python you have installed using:
pyenv versions
To check which version of Python is currently in use:
python -V
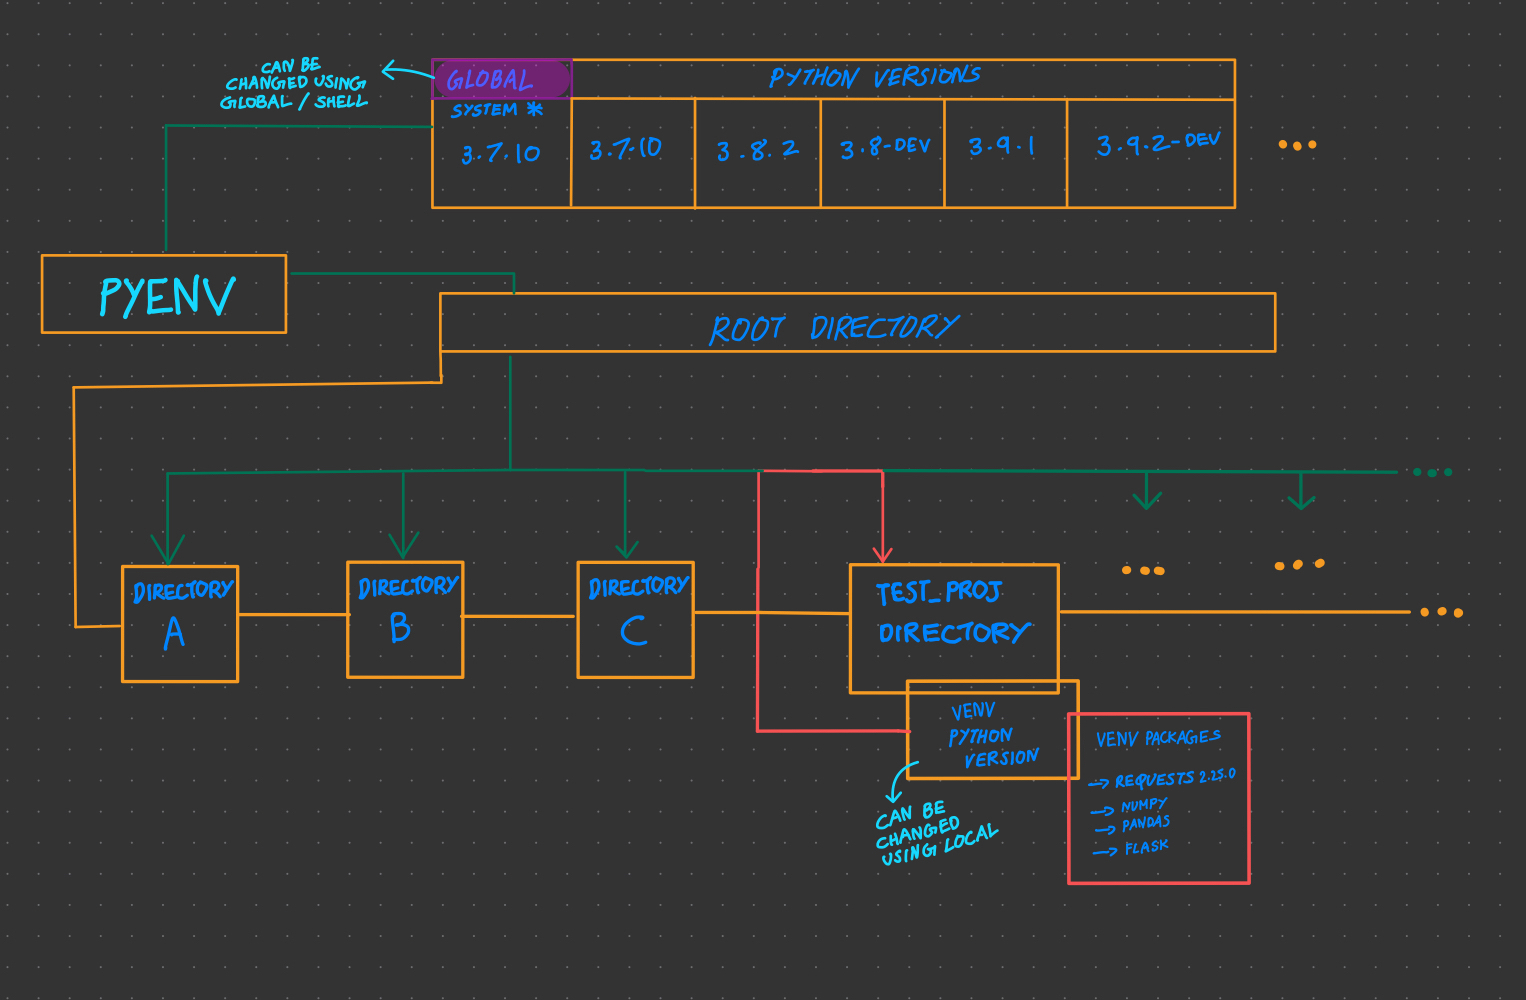
Now to change this you can use global, local, and shell commands. Let's explore them.
Navigating pyenv
Global
The global command sets the global Python version. So whenever you run with Python in the terminal, this is the version it will use by default.
You can set a global Python version using:
pyenv global 3.7.10
Local
Using the local command, you can set a specific Python version for your projects. Navigate to your project directory and run:
pyenv local 3.8
And now if you run which python it should point to version 3.8.
But if you navigate out of the directory and run the command again, it should point to version 3.7.10.
NOTE: The which Python command coupled with pyenv will return a PATH something along the lines of /Users/.pyenv/shims/python. This isn’t the actual PATH that points to where it is actually located. If you want the actual PATH use pyenv which python.
Shell
Say you want to test out the latest features of Python 3.9. You can temporarily set any Python version you want using the shell command:
pyenv shell 3.9
This will override both the global and local commands. So after you're done, when you want to revert to the previous configurations, run:
pyenv shell --unset
Pyenv-Vitrualenv
I have a venv. I have a pyenv. Ah, pyenv-virtualenv. As you might've guessed, you can combine pyenv and virtualenv for a supercharged dev environment.

Here's the command:
pyenv virtualenv + [Python version no.] + [venv name]
For example:
pyenv virtualenv 3.7.10 venv
This creates a virtual environment of Python version 3.7.10.
Now to activate the venv run:
pyenv local venv
You can change the Python version inside the venv using the local tag in pyenv. After you're done working with the venv you can deactivate it using:
pyenv deactivate
TL;DR
1. Using pyenv we can manage multiple Python versions.2.
pyenv global changes the Python version globally.3.
pyenv local changes the Python version inside a specific directory.4.
pyenv shell overrides both global and local. And you can revert using pyenv shell --unset5. You can combine pyenv and vitrualenv.
pyenv virtualenv [Python version] venv.6. To activate the venv
pyenv local activate7. To deactivate it
pyenv deactivateFin.
Hey 👋 ! If you like my writing, consider subscribing to my free weekly newsletter. I send out essays/tutorials & newsletters 🗞 on Tech. Programming. Algorithms. You can read a previous issue here before you subscribe.
Comments
Join the discussionNo comments yet. Be the first to comment.
